Posted on

Grilled Cauliflower with Turmeric & Tahini Vinaigrette

Grilled Cauliflower with Turmeric & Tahini Vinaigrette

Whether you’re firing up the grill for a late-summer cookout or looking for a comforting dish to welcome the arrival of fall, grilled cauliflower with Turmeric & Tahini Vinaigrette is the perfect transition for the seasons.


As the temperatures begin to dip in late summer and early fall, we’re all about meals that transition with the seasons. We’re not quite ready to give up summer BBQs, but we’re starting to crave more hearty fare. This Grilled Cauliflower dish bridges the gap between the light, fresh flavors of summer and the heartier, more robust dishes of autumn. It combines the smoky goodness of grilled cauliflower with the earthy flavors of turmeric and the nuttiness of tahini, resulting in a mouthwatering and satisfying meal that’s both vegan and gluten-free. It’s a perfect transitional recipe to celebrate the changing seasons.

The Beauty of Cauliflower Steaks

Cauliflower steaks have gained popularity in recent years, and for good reason. This versatile vegetable takes center stage when sliced into thick “steaks” and grilled to perfection. The result is a hearty, meaty texture with a slightly crispy exterior and a tender, flavorful core. Cauliflower steaks are not only visually stunning but also a fantastic option for those looking to reduce their meat consumption or follow a plant-based diet.

The Turmeric & Tahini Duo

The star of this recipe however, is our vibrant Turmeric & Tahini Vinaigrette. Turmeric, known for its anti-inflammatory properties, adds a warm and earthy flavor to the dish. Tahini, made from ground sesame seeds, brings creaminess and a slightly nutty flavor that balances the boldness of turmeric. Pair that with a little apple cider vinegar, a touch of maple syrup and a dash of cayenne and you have a nutritional powerhouse that pairs perfectly with cauliflower.

As summer gives way to fall, seize the opportunity to celebrate the changing seasons by indulging in the delightful flavors of grilled cauliflower with our Turmeric & Tahini Vinaigrette.

How to make Grilled Cauliflower with Turmeric & Tahini Vinaigrette

  1. Prepare the Cauliflower Steaks: Trim the leaves from the cauliflower and carefully slice it into 1-inch thick steaks. Be sure to keep the core intact to hold the steaks together. Brush both sides of the steaks with Taste of the Okanagan Turmeric & Tahini Vinaigrette.
  2. Preheat the Grill: Preheat your grill to medium-high heat. Make sure the grates are clean and lightly oiled to prevent sticking.
  3. Grill the Cauliflower: Place the cauliflower steaks on the grill and cook for about 5-7 minutes on each side, or until they are tender and have grill marks. Cooking times may vary, so keep an eye on them to prevent burning.
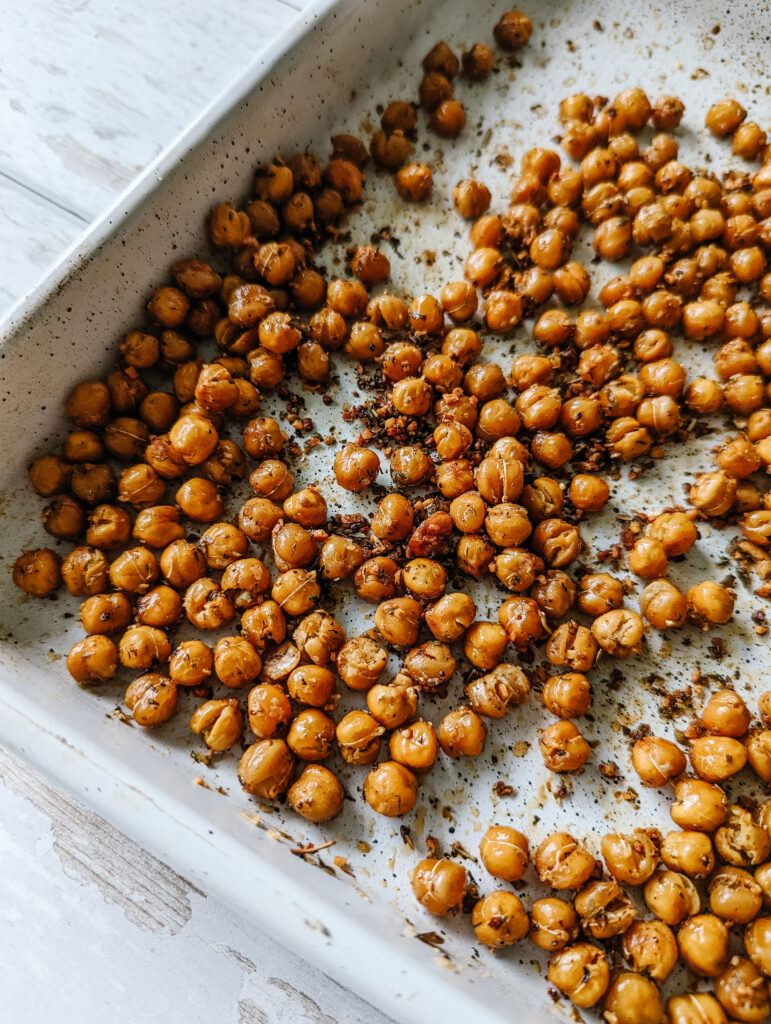
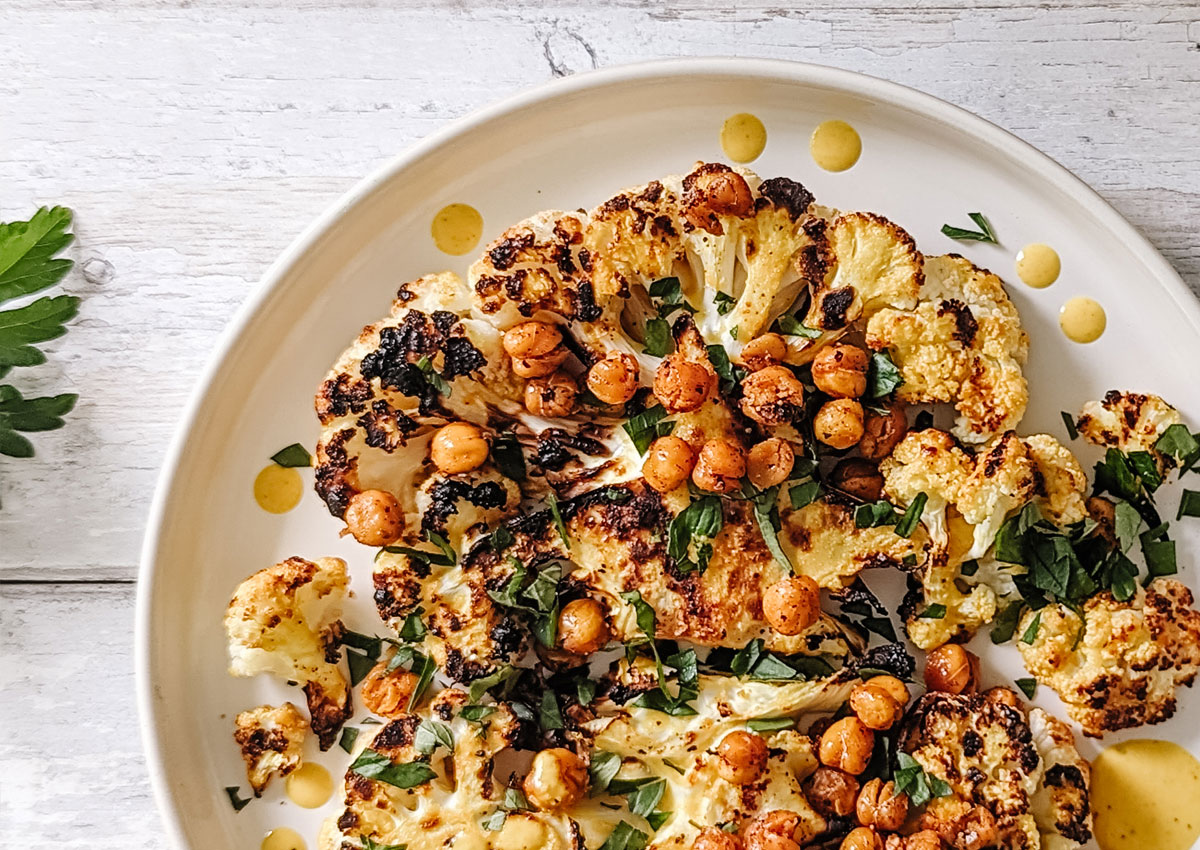
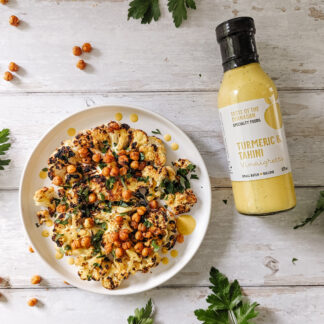
  4. Serve and Enjoy: Once the cauliflower steaks are done, transfer them to a serving platter, and drizzle with more our Turmeric & Tahini Vinaigrette over the top. Garnish with fresh herbs like parsley or cilantro for added freshness and color and top with crispy chickpeas.
Grilled Cauliflower with Turmeric & Tahini Vinaigrette

Grilled Cauliflower with Turmeric & Tahini Vinaigrette

Whether you’re firing up the grill for a late-summer cookout or looking for a comforting dish to welcome the arrival of fall, grilled cauliflower with Turmeric & Tahini Vinaigrette is the perfect transition for the seasons.

Ingredients
  

Instructions
 

  • Trim the leaves from the cauliflower and carefully slice it into 1-inch thick steaks. Be sure to keep the core intact to hold the steaks together. Brush both sides of the steaks with Taste of the Okanagan Turmeric & Tahini Vinaigrette.
  • Preheat your grill to medium-high heat. Make sure the grates are clean and lightly oiled to prevent sticking.
  • Place the cauliflower steaks on the grill and cook for about 5-7 minutes on each side, or until they are tender and have grill marks. Cooking times may vary, so keep an eye on them to prevent burning.
  • Place the cauliflower steaks on the grill and cook for about 5-7 minutes on each side, or until they are tender and have grill marks. Cooking times may vary, so keep an eye on them to prevent burning.
Posted on

Crispy Chickpeas: The Ultimate Back-to-School Snack

Crispy Chickpeas

Looking for a quick, crunchy, and healthy snack to power you through those study sessions? Say hello to Crispy Chickpeas!


As the back-to-school season approaches, it’s time to prepare for the challenges and opportunities that lie ahead. Whether you’re a student gearing up for a new semester or a parent ensuring your child is ready for the academic year, one thing is certain: snacking is an essential part of the journey. Instead of reaching for sugary or processed snacks, why not opt for something both delicious and nutritious? Enter Crispy Chickpeas – the ultimate back-to-school snack.

Why Crispy Chickpeas?

Crispy chickpeas are the perfect snack for those busy school days. Not only are they incredibly easy to make, but they are also packed with essential nutrients that will keep your energy levels steady and your focus sharp.

Crispy Chickpeas

Here’s How to Make Them:

Ingredients:

Instructions:

Drain and wash the can of chickpeas. Dry them well, then spread them in a single layer on a baking sheet. Roast for about 15 minutes at 400°F. Remove the chickpeas from the oven and drizzle with olive oil. Stir until all the chickpeas are coated, then sprinkle with your favourite Taste of the Okanagan Seasoning (Okanagan Magic, Gaga For Greek, South of the Border or Dill-icious). Return to oven and roast for an additional 10 minutes, stir the chickpeas and roast for 10 minutes more. Turn off the oven and let chickpeas cool with the door open.

The Health Benefits:

Crispy chickpeas are not just delicious; they’re also incredibly healthy. Here’s why they’re an ideal snack choice for students:

  1. Protein-Packed: Chickpeas are a great source of plant-based protein, helping to keep you full and satisfied.
  2. Fiber-Rich: They’re also rich in fiber, which aids in digestion and promotes a feeling of fullness.
  3. Steady Energy: The combination of protein and fiber in chickpeas ensures your energy levels remain stable throughout the day – perfect for those long study sessions.
  4. Nutrient-Rich: Chickpeas are loaded with essential vitamins and minerals, including iron, magnesium, and vitamin B6, which are important for cognitive function and overall health.
Crispy Chickpeas

Snack with a Purpose:

Crispy chickpeas are more than just a delicious snack; they’re a choice that fuels your body and mind. When you choose wholesome snacks like these, you’re making an investment in your well-being and productivity.

Share the Joy:

Don’t keep this snack discovery to yourself! Snap a pic of your crispy chickpeas and share it with your fellow students or parents. Encourage them to ditch the less nutritious options and join you on the path to healthier snacking.

Crispy Chickpeas

Looking for a quick, crunchy, and healthy snack to power you through those study sessions? Say hello to Crispy Chickpeas!

Ingredients
  

Instructions
 

  • Drain and wash the can of chickpeas.
  • Dry them well, then spread them in a single layer on a baking sheet.
  • Roast for about 15 minutes at 400°F.
  • Remove the chickpeas from the oven and drizzle with olive oil. Stir until all the chickpeas are coated, then sprinkle with your favourite Taste of the Okanagan Seasoning (Okanagan MagicGaga For GreekSouth of the Border or Dill-icious).
  • Return to oven and roast for an additional 10 minutes, stir the chickpeas and roast for 10 minutes more.
  • Turn off the oven and let chickpeas cool with the door open.
Posted on

Smoked Salmon Cucumber Rolls

Smoked Salmon Cucumber Rolls

Beat the heat with these refreshing smoked salmon cucumber rolls! This no-cook appetizer is perfect for those hot summer days when you want something light and delicious.


These smoked salmon cucumber rolls not only offer a delightful combination of flavors and textures but also provide a satisfying crunch that adds to their appeal. The coolness of the cucumber, the creamy richness of the cheese, and the smoky essence of the salmon come together harmoniously, creating a tantalizing treat that is as visually pleasing as it is delicious. Whether you’re hosting a summer gathering or simply seeking a light and flavorful snack, these no-cook appetizers are a fantastic choice that will leave everyone wanting more. Elevate your culinary repertoire with these delightful rolls and savor the joys of effortless and refreshing dining.

Let’s dive into this easy recipe that will impress your guests and keep you cool. Here’s what you’ll need:

How to make Smoked Salmon Cucumber Rolls

1. Start by washing the cucumber thoroughly. Then, using a sharp knife or a mandoline slicer, cut thin, lengthwise slices of cucumber. Aim for slices that are about 1/8 inch thick and avoid the seedy center. These will serve as the “wrappers” for your rolls.

2. In a small bowl, mix the cream cheese with Taste of the Okanagan Lemon Dill Vinaigrette until well combined. Season with salt and pepper to taste. This mixture will add a burst of flavor to the rolls.

3. Lay out the cucumber slices on a clean surface. Pat them dry with a paper towel to remove excess moisture. This will help the cream cheese mixture stick better.

4. Spread a thin layer of the cream cheese mixture onto each cucumber slice. Make sure to cover the entire surface evenly.

5. Place a slice of smoked salmon on top of the cream cheese layer. If the salmon slices are too large, you can cut them to fit the cucumber slices.

6. Now, it’s time to roll up the cucumber slices. Start at one end and gently roll them up, keeping them as tight as possible without squishing the filling. Secure the end with a little bit of cream cheese mixture. Garnish with a sprig of fresh dill.

7. Repeat this process with the remaining cucumber slices, cream cheese mixture, and smoked salmon until you’ve used up all your ingredients.

8. Serve your delicious appetizers chilled, accompanied by lemon wedges for an extra burst of citrusy flavor. The combination of cool cucumber, creamy cheese, and smoky salmon will surely delight your taste buds.

These smoked salmon cucumber rolls are not only a fantastic no-cook option for hot weather, but they also make an elegant and healthy appetizer for any occasion. Enjoy their refreshing taste and impress your friends and family with this simple yet stunning dish. Stay cool and bon appétit! 🍽️😊

Smoked Salmon Cucumber Rolls

Smoked Salmon Cucumber Rolls

Beat the heat with these refreshing smoked salmon cucumber rolls!

Ingredients
  

Instructions
 

  • Start by washing the cucumber thoroughly. Then, using a sharp knife or a mandoline slicer, cut thin, lengthwise slices of cucumber. Aim for slices that are about 1/8 inch thick and avoid the seedy center. These will serve as the “wrappers” for your rolls.
  • In a small bowl, mix the cream cheese with Taste of the Okanagan Lemon Dill Vinaigrette until well combined. Season with salt and pepper to taste. This mixture will add a burst of flavor to the rolls.
  • Lay out the cucumber slices on a clean surface. Pat them dry with a paper towel to remove excess moisture. This will help the cream cheese mixture stick better.
  • Spread a thin layer of the cream cheese mixture onto each cucumber slice. Make sure to cover the entire surface evenly.
  • Place a slice of smoked salmon on top of the cream cheese layer. If the salmon slices are too large, you can cut them to fit the cucumber slices.
  • Now, it’s time to roll up the cucumber slices. Start at one end and gently roll them up, keeping them as tight as possible without squishing the filling. Secure the end with a little bit of cream cheese mixture. Garnish with a sprig of fresh dill.
  • Repeat this process with the remaining cucumber slices, cream cheese mixture, and smoked salmon until you’ve used up all your ingredients.
  • Serve your delicious appetizers chilled, accompanied by lemon wedges for an extra burst of citrusy flavor. The combination of cool cucumber, creamy cheese, and smoky salmon will surely delight your taste buds.
Posted on

Mustardy Deviled Eggs

Deviled Eggs with Brewhouse Mustard

Is it even a party without Deviled Eggs? Whether it’s Easter brunch, a summer picnic, or just because, you can’t go wrong with this classic recipe for Deviled Eggs.


I absolutely love deviled eggs. So much in fact, that I’ve been know to make them for just the two of us… at home… just because. It wasn’t until I sat down to write this post that I realized I didn’t actually even have a recipe to refer to. I usually just wing it, adding a little of this, a little of that, tasting as I go. Which I suppose is one of the great thing about Deviled Eggs, they are so easy to tweak and customize to your liking. Like them with a little kick? Add a bit of hot sauce. Like them a little on the sweeter side? Try adding a bit of bread and butter pickle juice.

The classic recipe below is a great jumping off point, but no matter how you choose to customize them, you can elevate them to “fancy” in juat seconds, with a little dollop of our Brewhouse Mustard.

You can’t have deviled eggs without hard boiled eggs

Over the years I’ve tried several methods of boiling eggs and my favouite fool-proof way is the one from seriouseats.com. Bring 3L of water to a boil in a large pot. Add your eggs and wait for the water to return to a boil, then turn the heat down to a gentle simmer. Cover with tight fitting lid and cook for 11 minutes.

Meanwhile fill a large bowl halfway full with ice and top with cold water. When the timer goes, remove your eggs with slotted spoon. I like to gently tap the shell on the counter before adding to the ice bath as I find it helps make the eggs easier to peel. Let the eggs sit in the ice bath until they are completely cool, about 15 minutes.

To peel, start the the wide end and peel under running water.

Mustardy Deviled Eggs
Print

Mustardy Deviled Eggs

Is it even a party without Deviled Eggs? Whether it's Easter brunch, a summer picnic, or just because, you can't go wrong with this classic recipe for Deviled Eggs.

Ingredients

  • 12 hard boiled eggs
  • 3 tbsp mayonnaise
  • 2 tbsp Dijon mustard
  • 2 tbsp Taste of the Okanagan Brewhouse Mustard (plus more for topping)
  • 3 tbsp white wine vinegar
  • 4 tbsp extra-virgin olive oil
  • a few dashes of hot sauce
  • Kosher salt, to taste

Instructions

  • Cut the hard boiled eggs in half and carefully remove the yolks. Set the whites aside and place all yolks in the bowl of a food processor with the remaining ingredients. Process until smooth, scraping down sides of bowl as necessary.
  • Transfer to a zipper-lock bag or a piping bag fitted with a piping tip. Pipe filling mixture into egg white halves, over stuffing each one. Top with a dollop of Taste of the Okanagan Brewhouse Mustard.
Mustardy Deviled Eggs
Posted on

Burger Monsters with Bacon Ketchup

Burger Monsters

Everyone loves burgers but these Halloween Burger Monsters are extra fun. Grab your favourite toppings (Bacon Ketchup of course) and let everyone create their own fun burger monster. Cheesy ‘teeth’, pickle ‘tongues’ and olive ‘eyeballs’, they’ll definitely be a graveyard smash!


Burger Monsters

How to make burger monsters

If you’re looking for new Halloween food ideas, or just a fun way to get the whole family involved in making dinner, these Burger Monsters are sure to be a hit.

Step 1: Make your burgers

For these Burger Monsters I made homemade beef patties, but you can use any store bought ones if you prefer. My burger recipe is pretty simple, I mix 500g of ground beef with 1/4 cup of Taste of the Okanagan Bacon Ketchup. Form the mixture into 4 patties and refrigerate until you’re ready to go.

Step 2: Gather your toppings

This is where you get to have some fun and get creative. Make cheese slices into teeth by cutting a zigzag pattern into one edge. You could make square teeth, buck teeth or even fangs. Sliced sandwich pickles make great tongues, and for eyes your possibilities are almost endless – black or green olives, cherry tomatoes, cocktail onions, capers, sliced hard boiled eggs. You could use Thai chilies or red pepper slices for horns. Try blue corn tortilla chips for bat wings, and mushrooms for ears. Use your imagination and be sure to share your favourite ideas with us in the comments.

Step 3: Grill your burgers & toast your buns

Preheat your BBQ to medium-high heat. Generously salt and pepper both sides of the burger patties. Place the burgers on the grill grates and cook, uncovered, for 4 to 7 minutes on each side (or until 160F). Butter your buns and lightly toast them on the grill, being carful not to burn them.

Step 4: Make your Monsters (Assemble your burgers)

Assemble your burger however you like. Cheesy ‘teeth’, pickle ‘tongue’… don’t forget to add some Bacon Ketchup to resemble blood. Add your top bun and decorate with eyes, ears, horns, and wings.

Sink your teeth to this spooky and filling monster burger for the perfect Halloween bite! 

Burger Monster
Posted on

Pepper Jelly Chicken Wings

Pepper Jelly Chicken Wings

These pepper jelly chicken wings are the perfect combination of that sweet, sticky, heat we all love. And the best part… they couldn’t be easier! Whether it’s game day entertaining or just your average wing Wednesday, pepper jelly chicken wings will have everyone asking for more.


How to make Pepper Jelly Chicken Wings

One of the best parts about this recipe is that it’s not really even a recipe. It’s more of just a suggestion, which trust me, you’re gonna love! You don’t need any fancy equipment like an air frier, but if you have one you can totally use it. You can bake them, grill them, broil them or deep fry them. I’ve done it all and you really can’t go wrong, no matter how you choose to cook your wings. The secret… a little bit of baking powder and of course our Beer Blasted Jalapeno Jelly!

Tossing chicken wings in baking powder will help them get very crispy, which of course it what you want in a chicken wing. Why? Baking powder is alkaline and breaks down peptide bonds, allowing the skin to get more brown and crisp. Science!

You’ll want about 1 teaspoon of baking powder, along with 1 teaspoon of salt and a 1/2 teaspoon of pepper for each pound of wings. Dry your wings really well with some paper towel, then mix together the baking powder, salt, and pepper. Toss with your wings, making sure they are all evenly coated. Once you’ve done that feel free to cook your wings any way you’d like. When the wings are finished cooking simply add them to a large bowl with a couple of scoops of Beer Blasted Jalapeno Jelly and toss to coat. The heat from the wings will melt the jelly and leave you with beautifully pepper jelly glazed chicken wings.

If you want to get a little fancy, you can brush some jelly directly on the wings during the last few minutes while baking or grilling the wings, flip and do the same to the other side. This will caramelize the sugars in the jelly which is delicious, but totally optional. Like I said before, this isn’t really a recipe, just more of a suggestion. If you’ve never made chicken wings at home, pick which ever method seems easiest, or try them all and let us know your favourite.

Pepper Jelly Chicken Wings

Pepper Jelly Chicken Wings

These pepper jelly chicken wings are the perfect combination of that sweet, sticky, heat we all love. And the best part… they couldn’t be easier!
Servings 4

Ingredients
  

  • 2 lbs Chicken Wings
  • 2 tsp Baking Powder
  • 2 tsp salt
  • 1 tsp black pepper
  • 1/2 cup Taste of the Okangan Beer Blasted Jalapeno Jelly
  • (For a milder heat, try our Jalapeno Gin Jelly, and at Christmas or Thanksgiving try our Cranberry Jalapeno Jelly.)

Instructions
 

For all methods:

  • Use paper towels to pat the wings dry and place them in a large bowl. It's important to dry them REALLY well! Combine the salt, pepper and baking powder in a small bowl. Then sprinkle the seasoning over the wings, tossing to evenly coat.

To Bake:

  • Adjust your oven rack to the upper-middle position. Preheat oven to 425 degrees F. 
  • Line a baking sheet with aluminum foil and place a wire rack (I use a cooling rack) on top. Spray the rack with non-stick spray. Arrange wings, skin side up, in single layer on prepared wire rack.
  • Bake on the upper middle oven rack, turning every 20 minutes until wings are crispy and browned. The total cook time will depend on the size of the wings but may take up to 1 hour.
  • Remove from oven and let stand for 5 minutes. Transfer wings to bowl and toss with Taste of the Okanagan Beer Blasted Jalapeno Jelly.

To Grill:

  • Heat a gas grill to 425 degrees F and lightly oil the grates.
  • Arrange the wings over direct heat. Cover the grill and cook the wings for 15 to 20 minutes, turning over every 5 minutes, until they are fully cooked through (until internal temperature of 165F is reached).
  • Transfer wings to bowl and toss with Taste of the Okanagan Beer Blasted Jalapeno Jelly.

To Air Fry

  • Arrange the wings on the air fryer tray or in the air fryer basket. Then generously spray them with oil.
  • Set the temperature to 380 degrees F for 15 minutes. Then flip the wings, spray with olive oil, and air fry for another 10-15 minutes, until they are cooked through (internal temperature of 165F).
  • Transfer wings to bowl and toss with Taste of the Okanagan Beer Blasted Jalapeno Jelly.
Posted on

Grilled Peach & Prosciutto Pizza

Grilled Peach & Prosciutto Pizza

Forget tomatoes… This grilled pie combines savory and sweet with caramelized peaches, oozing mozzarella, salty prosciutto, and fragrant basil. All grilled together on your backyard BBQ, so you can skip turning on the oven.


Forget the oven! The easiest way to cook pizza at home is on your BBQ. Grilled pizza is a backyard staple for us in the summer time (or really all year round) not just so we don’t heat up the house by turning on the oven, but because most ovens can only reach a temperature of around 450°F, where are your BBQ can get closer to 600°F. While this isn’t quite as hot as a typical pizza oven, it’s the next best thing.

What you’ll need for this Grilled Peach & Prosciutto Pizza

Good pizza is all about simple quality ingredients. Less really is more in this case so you want to make sure you’re using the best ingredients you can get your hands on, and be careful not to overload your pizza.

  • Pizza Dough – I used frozen store bought pizza dough, which makes things super easy. Ask your local pizzeria, or Italian market, they’ve usually got some in their freezer section. If you’ve got a favourite dough recipe though, go ahead and use that. No matter what dough you’re working with, let it come to room temperature (you want it to be malleable), and be sure to flour anything the dough touches—your counter, your hands, your peel, if you have one—to prevent sticking.
  • Peaches – We want fresh peaches for this recipe, frozen ones just wont cut it. Wash them, and slice them, but don’t bother peeling them.
  • Prosciutto – Again since there isn’t much to this pizza make sure you’re using quality prosciutto. Trust me you’ll taste the difference.
  • Mozzarella – I used two types of mozzarella for this pizza. Fresh, sliced mozza, spaced across the crust and shredded low-moisture mozza to top it all off.
  • Taste of the Okanagan Jalapeno Gin Jelly – We’re using this in place of your typical tomato sauce. It brings out the sweetness of the peaches with just a little bit of kick.
  • Basil – Top it all off with some fresh torn basil

How to grill pizza

Grilling pizza is not difficult, but it does require a bit of preparation and some timing. You’ll want to get your grill as hot as possible, and have all your ingredients ready to go before you start. You’re going to cook the pizza right on the grates, and it’s going to come together pretty quick.

While you’re BBQ is heating up I like to grill the peaches. Simply brush them with a little olive oil and place them directly on the grill. Leave them for about 5 minutes or until you’ve got some nice grill marks, and then flip them over. Cook for two more minutes, and then transfer them to a plate and set aside. Close the lid on your BBQ and let it come the rest of the way up to temperature.

Gather the rest of your ingredients beside your BBQ and stretch your dough into about 10-12 inch rounds, don’t worry they don’t have to be perfect. Once your BBQ is nice and hot wipe down the grates with a bit of oil, and place your stretched out dough right on the grill. The trick to grilled pizza is that you cook the plain dough first, then flip it and top it.

Grill the dough for about 2 minutes, than flip it and spread the Taste of the Okanagan Jalapeno Gin Jelly all over the grilled side. Spread your fresh mozzarella around the pizza add the grilled peaches and sprinkle with the shredded mozzarella. Cook until the cheese has just melted, then remove from the grill and top with prosciutto and torn basil leaves. Drizzle with a little melted Jalapeno Gin Jelly and serve.

Grilled Peach & Prosciutto Pizza

Grilled Peach & Prosciutto Pizza

Forget tomatoes… This grilled pie combines savory and sweet with caramelized peaches, oozing mozzarella, salty prosciutto, and fragrant basil. All grilled together on your backyard BBQ, so you can skip turning on the oven.
Servings 4

Ingredients
  

  • 1 lbs pizza dough
  • 250 g fresh mozzarella
  • 150 g low moisture (pizza) mozzarella
  • 1 peach cut into thin wedges
  • 12 slices prosciutto
  • 1/2 cup Taste of the Okanagan Jalapeno Gin Jelly
  • 1/3 cup fresh basil

Instructions
 

  • Pre-heat your BBQ to as high as it will go
  • Brush peach slices with oil and place them directly on the grill. Leave them for about 5 minutes or until you’ve got some nice grill marks, and then flip them over. Cook for two more minutes, and then transfer them to a plate and set aside. 
  • Gather the rest of your ingredients beside your BBQ and stretch your dough into about 10-12 inch rounds, don’t worry they don’t have to be perfect. Once your BBQ is nice and hot wipe down the grates with a bit of oil, and place your stretched out dough right on the grill. The trick to grilled pizza is that you cook the plain dough first, then flip it and top it.
  • Grill the dough for about 2 minutes, than flip it and spread the Taste of the Okanagan Jalapeno Gin Jelly all over the grilled side. Spread your fresh mozzarella around the pizza add the grilled peaches and sprinkle with the shredded mozzarella. 
  • Cook until the cheese has just melted, then remove from the grill and top with prosciutto and torn basil leaves. Drizzle with a little melted Jalapeno Gin Jelly and serve.
Posted on

Roasted Cherry and Goat Cheese Crostini

Roasted Cherry and Goat Cheese Crostini

Don’t let cherry season pass you by without trying the perfect summer appetizer. This Roasted Cherry and Goat Cheese Crostini is a beautiful balance of sweet and savory with fresh Okanagan cherries, roasted with our Sangria Wine Jelly, fresh thyme, and creamy goat cheese, all piled on toasted baguette slices.


While straight off the tree is my favourite way to enjoy cherries, you can take your fruit to the next level by roasting it! It’s an incredible way to bring out the natural sweetness and add some flair to any dish. These roasted cherries would be delicious with grilled chicken or used to top greek yogurt & granola. Today we’re using them is this easy crostini appetizer which is sure to impress all your guests.

Roasted Cherries with Sangria Wine Jelly

What you’ll need for Roasted Cherry Crostini

When it comes to summer appetizers we’re all about simple around here. Just a few quality ingredients that let the fresh produce shine. These crostini really are incredibly easy to make but they look beautiful and feel elevated — AKA appetizer goals! Here’s what you’ll need:

  • Bread – A simple French baguette is the best option.
  • Cherries – We’re using sweet, dark cherries for this recipe. We’re lucky enough to live in the Okanagan and have access to beautiful local cherries this time of year, but check your local farm market or even the supermarket as BC cherries get exported all over the world.
  • Sangria Wine Jelly – We’re using this to glaze the cherries and add a little caramelization.
  • Goat Cheese – This creamy and tangy cheese balances out the sweetness, but if you’re not a goat cheese fan you could absolutely use ricotta or even brie instead.
  • Fresh Thyme – This is growing in abundance this time of year in my herb garden and I like the warm earthiness it brings to the cherries.
Roasted Cherries with Sangria Wine Jelly

How to make this summer cherry appetizer

As I’ve said before, this recipe really couldn’t be easier. The most difficult (or rather time consuming) part is pitting the cherries. If you don’t have a cherry pitter you can use a knife to cut the cherreis in half, and gently remove the pits, or check out our quick hack on pitting cherries with a straw and an empty wine bottle.

Once you’ve got your cherries pitted toss them with the Sangria Wine Jelly and a pinch of salt, then spread them on a single layer on a baking sheet. Add a few sprigs of fresh thyme and roast in a 400°F oven for about 10 minutes. While the cherries are roasting slice the baguette into 1/4 inch slices and brush with some olive oil. Lay them out on a baking sheet and toast them on the top rack of the oven. You can do this at the same time as the cherries are roasting (or ahead of time) as they should take about the same amount of time. When the bread is nicely toasted remove it from the oven and let cool. The cherries can be transferred to a bowl with any of the remaining juices. Discard the thyme sprigs.

When you’re ready to assemble. Spread a generous layer of goat cheese on the toasted baguette slices. Top with the roasted cherries, drizzle with the juices and sprinkle a little more fresh thyme.

Tip: Room temperature goat cheese is easier to spread, so take it out of the fridge while you’re roasting your cherries and allow it to soften.

Roasted Cherry and Goat Cheese Crostini

Roasted Cherry and Goat Cheese Crostini

This Roasted Cherry and Goat Cheese Crostini is a beautiful balance of sweet and savory with fresh Okanagan cherries, roasted with our Sangria Wine Jelly, fresh thyme, and creamy goat cheese, all piled on toasted baguette slices.

Ingredients
  

  • 1 baguette sliced on the bias about 1/4" thick
  • 2 cups cherries pitted and sliced in half
  • 1/4 cup Taste of the Okanagan Sangria Wine Jelly
  • 2-3 sprigs fresh thyme plus more for garnish
  • 1 cup goats cheese apx 1 tbsp per slice
  • salt to taste

Instructions
 

  • Toss the cherries with the Sangria Wine Jelly and a pinch of salt, then spread them on a single layer on a baking sheet. Add a few sprigs of fresh thyme and roast in a 400°F oven for about 10 minutes. 
  • While the cherries are roasting slice the baguette into 1/4 inch slice and brush with some olive oil. Lay them out on a baking sheet and toast them on the top rack of the oven for about 7-10 minutes or until golden brown.
  • Spread a generous layer of goat cheese on the toasted baguette slices. Top with the roasted cherries, drizzle with the juices and sprinkle a little more fresh thyme and a touch of salt.
Posted on

Summer Fruit Salad with Cranberry Strawberry Vinaigrette

Summer Fruit Salad with Cranberry Strawberry Vinaigrette

Nothing says “Hello Summer” quite like this gorgeous summer fruit salad. Packed full of height of the season cherries, refreshing watermelon, tart raspberries and sweet strawberries, all topped off with our Cranberry Strawberry Vinaigrette.


Jump to Recipe

It’s hot, hot, hot here in the Okanagan, and I’ll take any excuse not to turn on the oven! Especially when all the fruit is ripe and ready for picking. This beautiful fruit salad isn’t just for looks though, it’s so refreshing and so much better than old school fruit salads where everyone just picks out the good bits. This salad is all the good bits!

What you need to make this summer fruit salad

  • Watermelon – Summer watermelon is the best for this recipe. It will make it extra sweet and delicious. Here are a couple tips for picking a good one:
    • Your watermelon should feel heavy for it’s size (this means it’s super juicy).
    • It should have a nice yellow (almost the color of a slightly ripe banana) splotch on it from where it was resting on the ground.
    • Try knocking on it – it should provide a nice “bounce” and have a hollow sound.
    • It shouldn’t be shiny.
  • Strawberries – You will need strawberries washed and sliced for this recipe.
  • Raspberries – Keep them whole and just toss them right in.
  • Cherries – This is probably the most time consuming part, pitting all your cherries. But if you want a quick little hack, check out this instagram reel for an easy way to pit cherries.
  • Fresh mint – This help bring out the freshness in this salad. Don’t have mint? No problem, you can easily swap in some basil to switch it up.

A few tips when making this salad

  • Eat this summer fruit salad immediately after you make it. As this salad sits in the fridge, the fruits continue to release moisture, making the salad soggy and watery. It still tastes good, but the textures are best when served fresh.
  • To add a note of saltiness, feel free to add crumbled feta cheese (vegan or regular) to this salad.
  • We love the monochrome pink/red berries and watermelon in this salad, but you can absolutely switch it up by adding in different berries like blueberries or blackberries, or even add some grapes or peaches.


Summer Fruit Salad with Cranberry Strawberry Vinaigrette

Summer Fruit Salad with Cranberry Strawberry Vinaigrette

Nothing says “Hello Summer” quite like this gorgeous summer fruit salad. Packed full of height of the season cherries, refreshing watermelon, tart raspberries and sweet strawberries, all topped off with our Cranberry Strawberry Vinaigrette.
Servings 6

Ingredients
  

  • 4 cups Watermelon cubed into 1 inch pieces
  • 1.5 cups Strawberries Sliced in half or thirds if large
  • 1.5 cups Raspberries
  • 1.5 cups Cherries pitted and halved
  • Fresh mint leaves torn or finely sliced
  • Taste of the Okanagan Cranberry Strawberry Vinaigrette

Instructions
 

  • Prep watermelon and berries and place in a large bowl. Drizzle dressing over top and lightly toss. 
  • Garnish with some torn mint.
Posted on

Sheet pan shrimp tacos with Fiesta Pear Salsa

Sheet pan shrimp tacos with Fiesta Pear Salsa

Ready to shake up taco night? These sheet pan shrimp tacos with Fiesta Pear Salsa will definitely do the trick. Quick, easy and healthy, if you’re bored with your usual taco night options, it’s time to switch things up.


Jump to Recipe

Sheet pan shrimp tacos with Fiesta Pear Salsa

This simple dish takes almost no time to make, so it’s perfect for busy weeknights. All you need is a handful of ingredients and you can have dinner on the table in less than 20 minutes. Simply toss shrimp with our South of the Border Taco Seasoning, roast for a few minutes until pink and juicy, then pile them into warm tortillas, filled with mashed avocado and crunchy slaw. Top with Fiesta Pear Salsa and you have your answer to Taco Tuesday. 

Here’s what you’ll need to make these sheet pan shrimp tacos:

  • Shrimp – I like to keep a bag of frozen shrimp in the freezer for easy weeknight meals. They thaw quickly under cold running water, making them the perfect last-minute dinner solution.
  • South of the Border Seasoning – This all in all-in-one taco season brings instant flavour to shrimp, chicken, beef and even veggies. 
  • Tortillas – Flour or corn, store-bought or homemade you can use which ever type you prefect. We like to lightly toast ous in a dry skillet, but you could also warm them in the oven. 
  • Slaw – While the shrimp are roasting you can whip up this simple slaw. Just mix shredded cabbage (or coleslaw mix) with a quick dressing made from sour cream, lime juice and our South of the Border Seasoning.
  • Fiesta Pear Salsa – This sweet, tangy and Spicy Salsa is unlike anything you’ve tried before.
  • Optional Toppings – You can customize these tacos with your favourite toppings like fresh cilantro, pickled red onions, sliced jalapenos, crumbled cotija (or feta) cheese, or serve them as is. Either way you won’t be disappointed.
Making creama for South of the Border Coleslaw

HOW TO MAKE SHRIMP TACOS:

Here’s a quick overview of how to make these sheet pan shrimp tacos. Full instructions included in the recipe below…

Cook the shrimp: Preheat the oven to 425. On a sheet pan, toss the shrimp with lots of South of the Border Seasoning and arrange them on a single layer. Roast for about 8-10 minutes.

Prep the slaw: While the shrimp are roasting, prep the slaw. Mix sour cream with lime juice and South of the Border Seasoning then toss with shredded cabbage (or coleslaw mix). Feel free to add shredded carrots and chopped cilantro, but if you’re in a hurry like I usually am, straight up cabbage is all you need. 

Assemble the tacos: Mash some avocado straight on to the warm tortillas. Load on a generous serving of the slaw, add a few shrimp and spoon over some Fiesta Pear Salsa. Top with some crumbled cotija cheese, cilantro or any other toppings then dive in!

Fiesta Pear Salsa the perfect topping for Shrimp Tacos

Sheet pan shrimp tacos with Fiesta Pear Salsa

Prep Time15 minutes
Cook Time10 minutes
Servings: 4

Ingredients

  • 1 lbs Shrimp peeled and devined
  • 1 tbsp Olive Oil
  • 2 tbsp Taste of the Okanagan South of the Border Seasoning
  • 1-2 Avocados
  • Tortillas
  • Cotija Cheese (or feta)

South of the Border Slaw

  • 2 cups Shredded Cabbage
  • 1/2 cup Sour Cream
  • 2 tbsp Taste of the Okanagan South of the Border Seasoning
  • 1/4 cup Fresh squeezed Lime Juice

Instructions

  • Preheat the oven to 450° F
  • On a baking sheet, toss the shrimp with olive oil and Taste of the Okanagan South of the Border Seasoning. Arrange in a single layer. Roast 6-8 minutes or until the shrimp is cooked. Set the shrimp aside.
  • While the Shrimp is cooking make the slaw. Mix the sour cream, lime juice and Taste of the Okanagan South of the Border Seasoning together in a small bowl. Pour desired amount over shredded cabbage and toss. You'll have extra dressing, but you can add extra to your tacos.
  • To assemble your tacos, mash some avocado on the warm tortillas. Load on a generous serving of the slaw, add a few shrimp and spoon over some Fiesta Pear Salsa. Top with some crumbled cotija cheese, cilantro or any other toppings then dive in